How to Create Sims 4 mods?


How to Create Sims 4 mods?
Today we are going to learn how to create a mod. This is going to be a simple and easy step-by-step tutorial, so once you’ve learned everything, you will be able to make a mod even if you have never tried it before. In the next later tutorial we will explain how to check your mod after an update and make sure it still works.
Tools needed:
Sims 4 Studio (S4S) download the beta version
Notepad ++
Step 1
Create a folder dedicated to mod making. You should also create sub-folders inside it. You are going to see an example of one such folder, however, set yours up in a way that makes sense to you. Below you can see the structure of my mod-making folder, the uppermost line is the main folder:
Sims 4 Mods
–Mods WIP
—–Name of Mod
–Extracted Resources
–Patch 9_24 (this is the date of the latest patch)
–Issues
Step 2
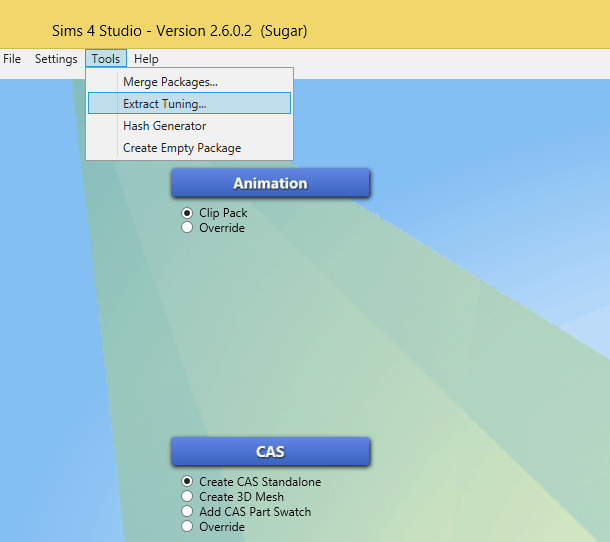
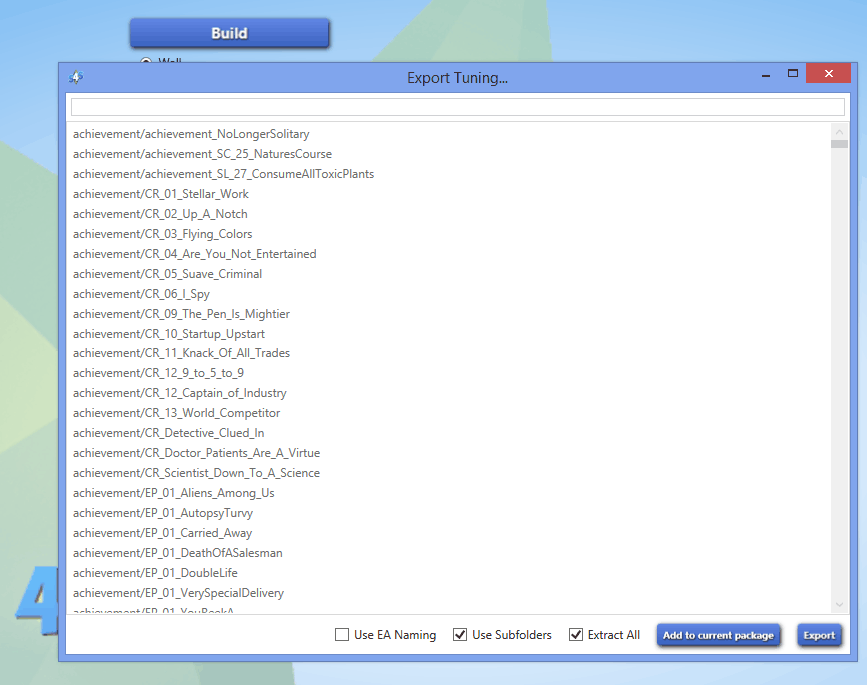
Now it’s time to extract the necessary resources from Sims 4. Start by launching S4S and then click on the tools tab and choose “extract tuning”. Be sure to tick the “use sub-folders” and “extract all” boxes, and do not tick the “use EA naming” box. Click on the export button and then choose the folder that you wish to export the files to (in the example it’s called the Extracted Resources for example). This is going to take quite some time – don’t worry, it’s perfectly normal, just have some patience please. It may take approximately almost 10 minutes – enough time to get a coffee or a snack.
Step 3
You are about to create your first mod! So, here is an idea… You probably know what it’s like when Sims stop an action you’ve directed them to do so that they can get a drink….sometimes they are not even thirsty! How about we prevent this kind of nuisance by making a “no auto drink” mod? Let’s start with creating a new folder inside the “Mods WIP” folder and calling it… yes – “No Auto Drink”. The next step will be to go to your “extracted resources” folder and type in ‘drink’ in the search window. Do not be surprised –you will get about 500 results! Yes, it is an impressive number; however, little by little you will learn to recognize which files you need and which ones can be ignored. You can simply take a look at various random files and check out what they do. Another thing you can do is open existing mods and see how they have become different, this will help you understand the process better.
Ok, so now that you know a little more about what is going on, let’s proceed. Type in GrabDrink, and the results will be much more precise. If you have a clearer idea about the file you want to modify, it makes your work much easier.


Step 4
Select the fridge_GrabDrinkAutonomously.InteractionTuning and cooler_GrabDrinkAutonomously.InteractionTuning XML files. Copy those files (be careful not to cut because editing of your master files is not your purpose in this case, they should remain as they are!) and paste them into the “No Auto Drink” folder that you have previously created in your Mods WIP folder.
Step 5
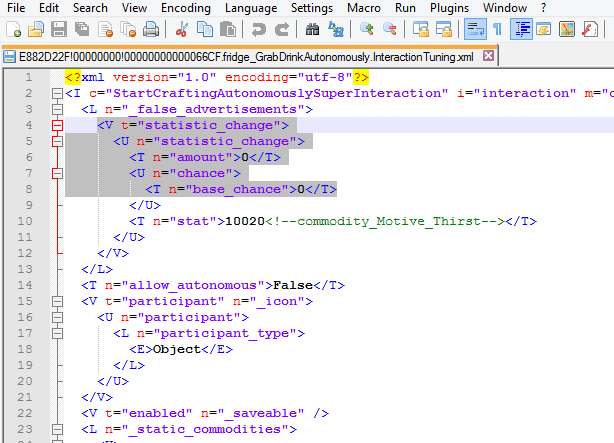
Find your “No Auto Drink” folder and click twice on the fridge_GrabDrinkAutonomously.InteractionTuning, you may have to give it the command to use notepad ++ in order to open this file. The very first section is what interests you, because this is what you are going to modify. Now, find where it says amount and base_change. This is what governs your Sims need to get a drink.
<V t=”statistic_change”>
<U n=”statistic_change”>
<T n=”amount”>6.67</T>
<U n=”chance”>
<T n=”base_chance”>100</T>
Let’s change it to:
<V t=”statistic_change”>
<U n=”statistic_change”>
<T n=”amount”>0</T>
<U n=”chance”>
<T n=”base_chance”>0</T>
That’s it – simply save your file and we can proceed to the other file that is in charge of Sims constantneed to get a drink.
Step 6
Click twice on the cooler_GrabDrinkAutonomously.InteractionTuning and repeat the previous edits. In fact, you can even copy/paste what you edited on your other file – that’s how easy it is.
<V t=”statistic_change”>
<U n=”statistic_change”>
<T n=”amount”>2.5</T>
<U n=”chance”>
<T n=”base_chance”>100</T>
Let’s change it to:
<V t=”statistic_change”>
<U n=”statistic_change”>
<T n=”amount”>0</T>
<U n=”chance”>
<T n=”base_chance”>0</T>
By the way, pay attention to every line is closed with a / something?
Example:
<U n=”chance”>
<T n=”base_chance”>100</T>
</U>
They are equivalent to punctuation marks or periods at the end of every sentence. When editing and adding lines it’s important to make sure that every line is correctly punctuated, otherwise you may encounter errors later on. Only alter the amounts, and you should be fine. On the other hand, if you decide to go a step further and add lines from other resources, please keep in mind what has been described above – the closing lines are important.
That’s it with the tough part. Now just go ahead and save this file as well and the next thing we will do will be… finally make your first mod. Sounds pretty exciting, right? You will be very proud of yourself once it’s done, and rightly so. So, let’s not waste your time and continue.
Step 7
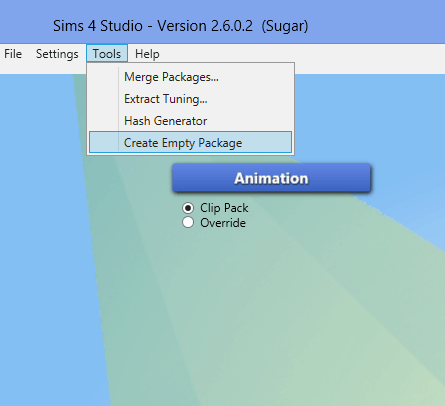
Open up S4S and select “Tools” and then you will select “Empty Package”. In the popup window, name your package. I suggest naming it with your initials and then what the mod does. I labeled mine HSNoAutoDrinks. Please be mindful of using characters like _ & { ] and spaces, it takes computers longer to process these characters and therefore it could eventually slow down your game.
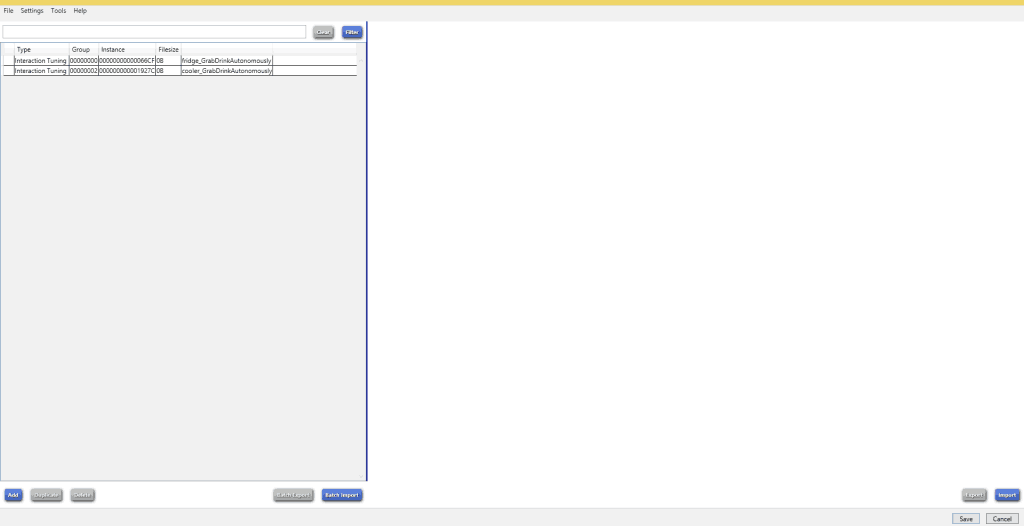
After saving your mod, you will click on the “batch import” button and then scroll to where you put those XML files. They should be inside that folder in your Mods WIP folder, being organized makes this process easier. Once you have selected all your resources, click on the open button. After ensuring that all your files have been placed into your package, save it. TADA! You just made your first mod. Congratulations.
Step 8 – The Most Important Step!
You must first test the mod you’ve made if you plan releasing it. Please do not share untested and dysfunctional mods with the community. Why don’t you offer other Simmers to test it and send you screenshots which you can later include when you release your mod. Once you have your mod thoroughly tested, transfer the entire folder over to the folder labeled for the latest patch. You are sure that these mods work well with that patch release.
And one more tip: have you seen the green writing? It’s the name of that resource item. This is useful when you decide to use that same resource in another mod or you want to make modifications. This is why it’s a good idea to read the stuff you find in the resource folder. As you keep studying the files, they start making more sense and you start feeling more comfortable , as a result, you will be better at making your own mods or updating outdated ones.
As far as updates of outdated mods are concerned: most modders don’t like when you do it. It is a good idea to send them a note to ask. If you have not gotten any response for a while (several weeks), go ahead and do the updating, just make sure you state explicitly that this is NOT YOUR mod and that you will promptly remove the update if the original creator requests that. Give a link to the original mod. Personally I have updated a number of mods and I will not share since I didn’t make them.
As you surely know, Sims 4 has lot of modding options. The great news is that all of us can not only install Sims mods, but create them as well. This is wonderful news, because everyone can make their creative ideas come true. However, first the obvious question needs to be answered: how to create Sims 4 mods? If you would like to learn how to create Sims 4 mods, keep reading this article.
A very important things is the fact that various mods may greatly improve the game quality. If you have decided to create a mod by yourself but do not know where to start, remember something – plenty of game fans, who have a lot of experience and knowledge in this field are ready to help you, you just need to reach out.
Our advice is to first read the following articles: how to create Sims 4 mods tutorial or Sims 4 modding guide. You will find plenty of useful information there. One more thing that you should keep in mind: if you wish to grow life by adding more pets, check out the new available mods of differents pets. And once again, just to keep you motivated – remember, being able to create various mods by yourself is a sure guarantee to have a more exciting and interesting game. Go ahead, give it a try!